Category: Computers

  • Zoom TV Interviews

    Feeding our Blackmagic ATEM Switcher with Zoom Participants

    Four computers running Zoom feeding Blackmagic ATEM

    A few weeks ago I had a blog post on my Zoom and Stream Deck configuration to support TV interviews. The setup continues to evolve and I wanted to take a moment to share an update.

    The biggest problem we have with Zoom is the Audio-Follow-Video auto-switching within Zoom. We prefer to see people full screen and don’t want to depend on the gallery view, in fact I try to avoid it.

    Using the spotlight or pin tools in Zoom just doesn’t work fast enough for our purposes. We want to cut between participants just like we would in a traditional in-studio interview show. This includes reaction shots and cutaways.

    Multiple Zoom Calls Into Switcher

    The new setup we’re experimenting with uses multiple PCs, all with separate Zoom connections, each set to full screen with a single participant “pinned”. The output of each PC feeds the Blackmagic ATEM via HDMI as a source.

    I was a little concerned about lip-sync or slight delays between PC connections to Zoom. Thankfully that’s been a non-issue, everything syncs!

    Primary Audio

    To be clear, we’re only pulling audio from ONE of the PCs (input #1) with the gallery view display. All other switcher inputs are video only.

    Once setup and configures, which does take a few minutes to establish all the Zoom calls, it works great! We can now switch between headshots, in the same way we would if guests were in-studio. I can bring in lower third graphics without fear the Zoom auto-switching and don’t need to chase pinning and spotlighting people.

    The only downside is the number of PCs needed… To have a true single shot of everyone you need one more PC than you have participants. (one is always dedicated to the gallery or multiview.)

    So in this case I have FOUR workstations running Zoom for a three-person show.

    Couple of Notes & Tips

    • “Hide self-view” on the PC displaying the gallery view.
    • All other Zoom workstations should have their mic and cameras OFF as they are for view only purposes of feeding the switcher.
    • All Zoom workstations must be set up in a dual-monitor setup, with the pinned zoom person on the second monitor. Then you want to open up the chatbox and place it on the first (primary monitor) THIS IS CRITICAL! Placing the chat box open on the primary monitor avoids pop-up alerts on your full screen pinned video. (Hopefully, that makes sense)
    • You also want to “Hide all non-video participants” on the main gallery view feed so you don’t see all the extra zoom caller PCs feeding the switcher.

    Happy to answer any questions and would love to hear anyone with suggestions on how I might improve things.

    What a mess! Our experimental COVID-19 rig is constantly changing. The lessons learned from this will no doubt alter our planned studio and control room upgrades scheduled for this year.
  • Stream Deck for Zoom Meetings

    Stream Deck for Zoom Meetings

    UPDATE: My setup for Zoom has evolved and somewhat less dependent on StreamDeck now. You may want to check out my new Blog Post with our updated Zoom setup for TV interviews.

    This week I purchased a Stream Deck XL ($235) to help streamline our video productions with Zoom remote guests.

    Since the COVID-19 crisis hit mid-March our community television station scrambled to adapt and help disseminate important information. Zoom quickly became the go-to platform for setting up meetings and remote show guests.

    In the past few weeks, we’ve produced more than a dozen programs using Zoom. Initially, we had an in-studio host and multiple remote guests displayed on an in-studio monitor. Now, most of our interview shows a produced entirely on Zoom.

    Despite the limitations, we are making every effort to maintain high production values, focusing on:

    • Good Clean Audio
    • Well Composed Shots (eyes on the upper third!)
    • Shot sequencing, Close Ups / Multi-Box Switching
    • Graphics, Lower Thirds, Etc.
    • Open/Close Music
    • Still Store for Inserts

    Our existing television studio was not set up well for the shift in production style. This prompted us to build a temporary video production console on several folding tables right inside our studio.

    Adding Steam Deck XL into the Workflow

    Using the Zoom keyboard shortcuts certainly helps the production value. I find myself using Shift-Command-W (Mac) constantly to switch between Speaker view and Gallery View in Zoom. To me that’s the key to using zoom for video production. You can force a better cadence of switching that matches the conversation.

    I do wish there was a way within Zoom that I could force a certain camera view to appear full screen, similar to the normal workflow of a video production switcher. Zoom does offer a “spotlight video” option which does this, but it’s not mapped to a keyboard shortcut and requires too many mouse clicks to make it useful.

    Another shortcut I use often hides the control panel buttons on the lower part of the screen.

    The Stream Deck XL simply automates the keyboard shortcut process and reduces keystrokes to a single button. Allowing new users in the video production environment to get up to speed faster and with better results.

    TIP – ENABLE GLOBAL SHORTCUT

    Enabling global shortcuts really helps the Stream Deck configuration. This setting allows the shortcuts to work even when Zoom is not in focus.

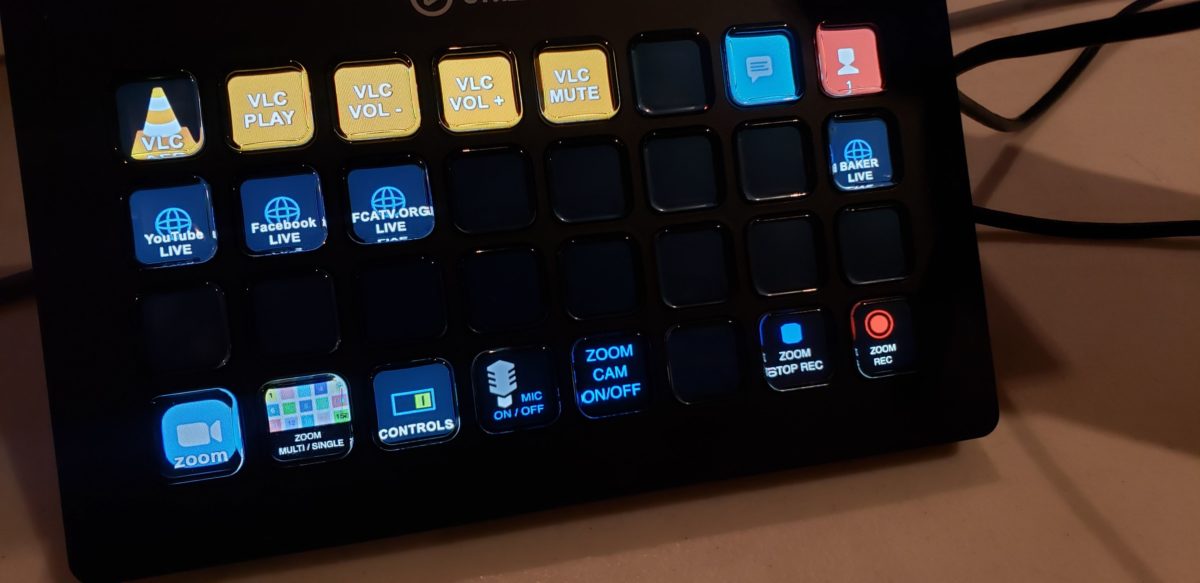
    We’re also using VLC shortcuts to play intro/outro music.

    Bottom row of buttons on our Stream Deck are all shortcuts for Zoom.

    Then I added several shortcuts to websites we use for our live broadcasts.

    A work in progress, but thought I’d share what we have setup so far. If you’re using Stream Deck for video production I’d be curious to hear your use case.

  • FIX: Greyed Out Folders on Mac OS

    Recently I had an issue with my Synology NAS Music folder that I use with Plex Media Server. Hundreds of folders were ghosted or greyed out an inaccessible.

    I was able to access the files through the Synology Disk Station web interface, not via Mac Finder and Plex could not access the files.

    Solution

    All the inaccessible files had a “creation date” of 1984. Multiple websites explain that updating the creation date to something current would fix the problem.

    The quickest way to do this that work for me was using Skytag’s FileBuddy.

    As an aside I attempted a command-line string “touch -t 201911240000 /Volumes/MUSIC/*” but it didn’t work for me. I was able to change the date modified, but not the date created.

    Once you install File Buddy the process is rather simple.

    1. Select all the folders and drag them to top of the File Buddy program icon on the Dock.
    2. Once File Buddy opens, click OK on the Get Info screen if it appears.
    3. You should get a screen similar to the one above. Simply change the Created Date using the drop-down, I just used Current Date and Time.
    4. Click “Change All”. This may take a few minutes if you have lots of files. Once complete the problem should be fixed.

    I honestly don’t know what caused the problem in the first place, but wanted to pass along what I found to be the quickest solution.

  • Late Night Repair

    Light-O-Rama CTB16PC 16 Channel Lighting Controller

    In helping my son prepare and set up his Christmas light show this year we discovered half the channels on this controller stopped working. This is our second Light-O-Rama CTB16PC controller, both were purchased as a kit.

    Just in case another Light-O-Rama ower runs into this page here’s the troubleshooting we performed and the ultimate solution that fixed our issue. (Spoiler: Assembly Mistake!)

    Symptom: Channels 1-8 Not Working. The controller connects to the network fine, 9-16 working 100%.

    Troubleshooting: First thought, blown fuse. We were setting things up in the rain and assumed it was related to a short.

    Fuse tested fine with a multimeter, swapped the two fuses in the unit, again fuses working fine.

    Used the multimeter to confirm 120v making it through fuse hold and tested each “hot” channel output. Things normal, although no voltage on channel 1-8 hots, as expected.

    After reviewing the Light-O-Rama forums I decided to take the controller completely apart and check for any bad solder joints. Of course, I made this decision at 11 PM. I was really trying to avoid this, such a time-consuming process.

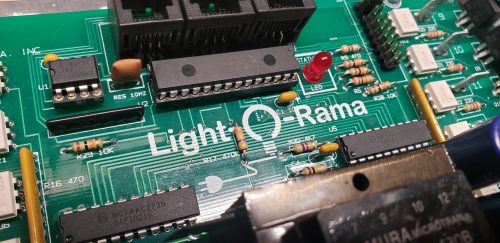
    Success! After a few minutes of careful inspection, I found two pins on an IC that I plain missed completely during assembly, no solder! I carefully applied solder, checked a few other spots and reassembled.

    BINGO! Problem solved.

    U4 IC 20 PIN (74ACT273)

  • LastPass Unlocked Event

    Last Thursday, October 3, 2019 I had an opportunity to attend LastPass’s UnlockedCybersecurity & Identity Trends event in Boston, MA.

    The panel of security experts included:

    • Bill Cheswick, Computer Security and Networking Researcher
    • Gerald Beuchelt, Chief Information Security Officer/Vice President for LogMeIn
    • Steve Gibson, Software Engineer, Security Researcher, and Host of the Security Now Podcast. grc.com

    I’m a big fan of Twit.tv, Leo Laporte, Steve Gibson and I use LastPass every day. So I was really excited to attend the event knowing I’d be participating in an engaging and fun conversation around security, passwords, and learn more about Steve’s solution for passwords, the SQRL project.

    The full-length video of the discussion is available on YouTube, which I’ve embedded below.

    Twit’tv Coverage of the Cybersecurity & Identity Trends Unlocked Event
    October 3, 2019 – Boston, MA
    Twit.tv’s Leo Laporte at the LastPass Unlocked event in Boston, October 2019
    Steve Gibson – grc.com
  • Hilton Hhonors Wifi vs. Verizon Hotspot

    Our family is on a short two-day ski trip in New Hampshire, staying at Hampton Inn & Suites North Conway. The hotel is great, extremely family friendly, and the staff are nice. There’s an amazing mini-water park  inside the hotel, bingo night, movie night complete with popcorn. Just a wonderful place.

    Unfortunately, I needed to sneak in a quick Skype TV interview for work Monday morning and was hoping the hotel wifi would be strong enough. In running some speed tests the night before and I was frightened by the results. I’m not a big business traveler, but I’ve heard the hotel wifi can vary significantly and often performs rather poorly.

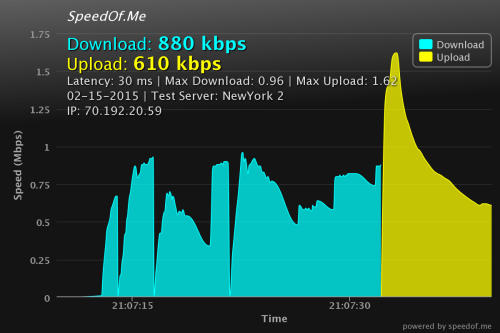
    I’m barely getting 1MB download and upload speeds and about half that:

    Hilton Hhonors Wifi Speed Test Results
    Hilton Hhonors Wifi Speed Test Results

    To be fair, I was testing the wifi at the worst possible time, 9pm on school vacation week. I believe the hotel is nearly full, it will be curious to see if there’s any improvement in the morning.

    (more…)

  • Upgrade MediaWiki, 5 Easy Steps Using FTP and Web Browser

    MediaWiki Easy UpgradeI run a relatively small wiki using MediaWiki hosted on a Dreamhost server. Generally, I like to stay on top of upgrades for the security patches, new features, and bug fixes but the manual upgrade process makes me nervous.

    I’ve been burned from nightmare Drupal CMS upgrades in the past. Losing hours of my life to troubleshooting and rebuilding is not something I ever want to repeat.

    Anyway, I’ve procrastinated for a while now on this MediaWiki upgrade. I finally decided to jump in this week and get it done. I thought I would share the process I used, which is not exactly the recommended process on the MediaWiki website, but I found it easy and straight forward.  I successfully avoided the command line, which makes me somewhat nervous and certainly not in my comfort zone.

    (more…)

  • FreeNAS, Twit.tv Exposes Me to Anouther Great Tool

    Not sure why I’ve not heard about FreeNAS before, but this looks great! I’m definitely going to spend some time learning more.

    Wonder if this could be a good, low-cost solution for storing archived video files, raw footage, and other large production files.

  • How to Speed Up the Motorola Droid Razr Maxx HD

    Here are two tips for speeding up a Motorola Droid Razr Maxx HD smartphone. If you’re like me and want the quick solution, scroll down to Tip #1 and get started.

    Little background, I purchased my Razr Maxx HD about two years now and I’ve become increasingly frustrated with it’s responsiveness. Everything about the phone became sluggish and for a long time I just dealt with it. I’m also a runner and use the phone to track my progress using the GPS tracking app RunKeeper. Last week the GPS accuracy was way off, the phone would struggle to find a GPS signal and once found, it would fade in and out. The whole situation finally drove me crazy enough that I spent some time looking for ways to speed up the phone, preferably WITHOUT performing a factory reset.

    Everyone uses their phones differently, for me I’m less concerned about the “fancy” stuff, such as widgets and live wallpaper. I also don’t play games with my phone, although my kids have been known to install them on occasion. I just want a phone that runs my apps efficiently.

    After searching the interwebs for some time I found two solutions which dramatically improved the phone speed. While you could certainly do the same search and likely find the same solutions, I thought I would share what worked for me and hopefully save you time.

    These tips assume you have already tried the “easy stuff”:

    • Remove Unused Applications
    • Avoid Using Widgets & Live Wallpaper
    • Cleanup & Delete Photos/Videos from Gallery

    I would also suggest you stay away from task killer apps and other management apps in an attempt to speed up your phone. It’s just not necessary and becomes just one more app running in the background. Generally, I think these apps are a bad idea.

    TIP #1 CLEAR/WIPE THE CACHE PARTITION

    This process significantly increased the speed of my phone. If you only do one thing, try this!

    Step by step instructions are available on the Verizon Support website, which I’ve included below.

    Warning Performing a wipe cache partition removes any temporary files that may be causing an issue with the device. All personal files and settings are not affected by this option.

    1. Power the device off.
    Note Press the Power button then select Power off.

    • Note If the device doesn’t respond to input, press and hold the Volume Up/Down then press and hold Power button. When the device screen goes blank, release the Power button while continuing to hold Volume Up/Down then proceed with step 3.

    2. Press and hold the Volume Up/Down then press the Power button.
    3. When presented with the Boot Mode Selection Menu, release all buttons.
    4. Press Volume Down to select Recovery then press Volume Up.
    5. From the Droid triage screen:

    • Press and hold Volume down.
    • Press and release Volume up.
    • Release Volume down.

    6. Select wipe cache partition then press the Power button.

    • Note Use Volume keys to navigate options.

    7. Select reboot system now then press the Power button.

    • Note Use Volume keys to navigate options.

    TIP #2 TURN OFF ANIMATIONS

    This action will remove the fades and animations that ease the transition between apps and screens. While it makes your phone experience “look” better, it comes at the expense of speed and processor time. I found turning the animation features off helped.

    Go to Settings -> Developer Options -> Animation Scale

    You’ll want to turn on Developer Options with the toggle at the top of the screen. Once enabled, scroll down and turn off the following:

    Animator Duration Scale
    Animator Duration Scale Menu

    Transition Animation Scale
    Transition Animation Scale

    Window Animation Scale
    wpid-screenshot_2014-04-08-14-22-45.png

    If you have any other suggestions, please share in the comment section below. Hope this helps!

  • FIX: Neatgear WNDR4500 Firmware Source of Internet Connection Dropping

    Netgear WNDR4500 Internet Connection Keeps Dropping
    Netgear WNDR4500

    5/7/15 UPDATE: The solution described in this blog post (from September 2013) may no longer be necessary.  I recently (April 2015) performed a firmware update and “reset the router to factory defaults” and life is good, no performance issues.

    The key “Revert to factory default settings.” step may have been the issue all along, something I don’t think I tired back in 2013.

    Thanks to Phil for sharing this solution in the comment section along with links.

    From Netgear’s Website:

    Note: Please remember to do factory default after firmware upgrade. Enter “Backup Settings” in the web GUI and click “Erase” button of “Revert to factory default settings”.

    Source: http://kb.netgear.com/app/answers/detail/a_id/25841

    Below is the original blog posted, which is an alternative solution if still have issues.


    For the past few weeks I’ve been troubleshooting a problem with my internet connection. I finally found the solution and want to share the solution, just in case others are having the same issue.

    Symptoms
    My WAN or internet connection was dropping at least once a day, sometimes 3-4 times per day. Power cycling (unplug/plug back in) the cable modem OR the router would temporarily restore the connection, but this never resolved the problem.


    Neatgear Firmware V1.0.1.20_1.0.40 StableSolution Firmware version 1.0.1.36 for the Netgear WNDR4500 was the source of my problem. I rolled back to the previous version V1.0.1.20_1.0.40 and BINGO, my internet connection was stable once again! You can download V1.0.1.20_1.0.40 from the Netgear Support Website for the WNDR4500, click on "Get More Downloads" for the list of previous firmware. Once you download the firmware, access the router's admin panel through a web browser.  By default the address is: http://192.168.1.1/.  Once logged in, go to the advanced tab and select "Router Update" under the administration section. Here is a screenshot of the router update: [caption id="attachment_525" align="aligncenter" width="500"]Netgear WNDR4500 Firmware Update Screen Netgear WNDR4500 Firmware Update Screen[/caption] From here it's straight forward, click browse, find your V1.0.1.20_1.0.40 file and upload to the router.  After rebooting the system, you should be FIXED! Hopefully Netgear is able to fix whatever issue they are having with V1.0.1.36, which was released in May 2013.  Running the latest firmware is normally a good idea, USUALLY fixes bugs and strengthens security of the hardware. Hope this helps, what frustration! My broadband provider offered to come out and check the lines, with the usual warning...if it's determined the problem is with your equipment, we will need to charge for the service call. Love that... I'm glad I said "no thanks".