Category: How To

  • Trim video without re-encoding using ffmpeg

    I’ve been taking the time to learn ffmpeg and some of the really useful stuff you can do with this command line tool (CLI).

    Here’s one example of a situation I find myself in frequently and have not had a great solution until now.

    The ability to trim a video file without re-encoding!

    “Re-encoding” means loss of video quality in my mind. Not quite as bad as copying a VHS tape, known in the analog world as a “generation loss” Having the ability to trim a video file WITHOUT suffering any quality loss, that was a WOW ffmpeg moment for me.

    This is an issue that comes up frequently in community media and I’m sure all video professionals have delt with this issue.

    You have some raw footage you wan to keep for the future, but the camera operator forgot to stop recording and the file has a bunch of “junk” at the end.

    Or you digitized some analog tapes and during the process you walk away only to come back to “snow” or “junk” at the end of the tape that you have now just captured.

    Or you have a video file with the standard leader of color bars and countdown at the beginning. You want to trim the footage, but don’t want to lose video quality in the process…

    So you either keep all the extra “junk” taking up space on your drive or you open up your editing software and edit out the junk and take the hit and re-encode.

    Right now, I’m cleaning up a 70TB Synology NAS that is nearly full. I found several large files that fit the above examples.

    Using ffmpeg and a rather simple command line, I was able to clean up some of these files and free up some space.

    Here’s an example of the command line I used:

    ffmpeg -i BestVideoEver.mov -ss 00:37 -t 51:14 -c:a copy -c:v copy BestVideoEver-trimmed.mov

    To break this string down just a bit, here’s what’s happening

    -i = Input Video
    -ss 00:00 = In-Point (everything before will be removed)
    -t 00:00 = Out-Point (everything after will be removed)
    -c:a copy = Copy Audio (Copy NOT re-encode)
    -c:v copy = Copy Video (Copy NOT re-encode)

    Finally “BestVideoEver-trimmed.mov” is the ffmpeg output file, which you can set to a specific destination if you want, for example:

    ffmpeg -i BestVideoEver.mov -ss 00:37 -t 51:14 -c:a copy -c:v copy /users/michaelwebber/Desktop/BestVideoEver-trimmed.mov

    Anyway, that’s it! Something I learned how to do recently and wanted to share just in case others find it useful.

    If you want to learn MUCH more about ffmpeg I recommend reading this blog post. Covers a whole bunch of topics including how to install ffmpeg and many of the cool features. Never knew you could edit video and even add text graphics with ffmpeg. I really recommend this blog post at img.ly, an in-depth, well-organized post.
  • Stream Deck for Zoom Meetings

    Stream Deck for Zoom Meetings

    UPDATE: My setup for Zoom has evolved and somewhat less dependent on StreamDeck now. You may want to check out my new Blog Post with our updated Zoom setup for TV interviews.

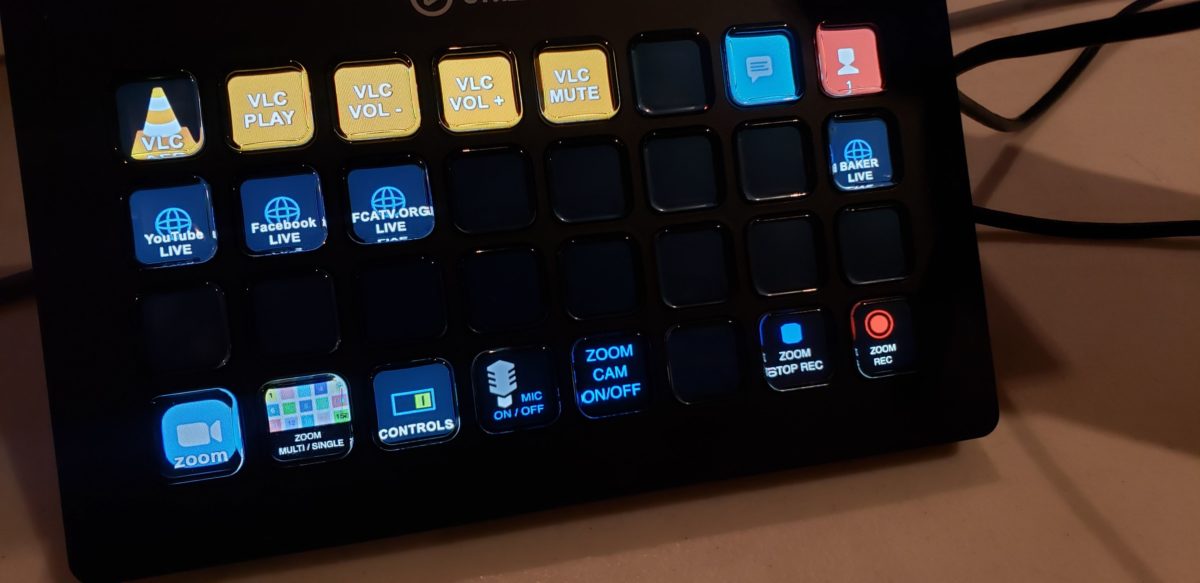
    This week I purchased a Stream Deck XL ($235) to help streamline our video productions with Zoom remote guests.

    Since the COVID-19 crisis hit mid-March our community television station scrambled to adapt and help disseminate important information. Zoom quickly became the go-to platform for setting up meetings and remote show guests.

    In the past few weeks, we’ve produced more than a dozen programs using Zoom. Initially, we had an in-studio host and multiple remote guests displayed on an in-studio monitor. Now, most of our interview shows a produced entirely on Zoom.

    Despite the limitations, we are making every effort to maintain high production values, focusing on:

    • Good Clean Audio
    • Well Composed Shots (eyes on the upper third!)
    • Shot sequencing, Close Ups / Multi-Box Switching
    • Graphics, Lower Thirds, Etc.
    • Open/Close Music
    • Still Store for Inserts

    Our existing television studio was not set up well for the shift in production style. This prompted us to build a temporary video production console on several folding tables right inside our studio.

    Adding Steam Deck XL into the Workflow

    Using the Zoom keyboard shortcuts certainly helps the production value. I find myself using Shift-Command-W (Mac) constantly to switch between Speaker view and Gallery View in Zoom. To me that’s the key to using zoom for video production. You can force a better cadence of switching that matches the conversation.

    I do wish there was a way within Zoom that I could force a certain camera view to appear full screen, similar to the normal workflow of a video production switcher. Zoom does offer a “spotlight video” option which does this, but it’s not mapped to a keyboard shortcut and requires too many mouse clicks to make it useful.

    Another shortcut I use often hides the control panel buttons on the lower part of the screen.

    The Stream Deck XL simply automates the keyboard shortcut process and reduces keystrokes to a single button. Allowing new users in the video production environment to get up to speed faster and with better results.

    TIP – ENABLE GLOBAL SHORTCUT

    Enabling global shortcuts really helps the Stream Deck configuration. This setting allows the shortcuts to work even when Zoom is not in focus.

    We’re also using VLC shortcuts to play intro/outro music.

    Bottom row of buttons on our Stream Deck are all shortcuts for Zoom.

    Then I added several shortcuts to websites we use for our live broadcasts.

    A work in progress, but thought I’d share what we have setup so far. If you’re using Stream Deck for video production I’d be curious to hear your use case.

  • FIX: Greyed Out Folders on Mac OS

    Recently I had an issue with my Synology NAS Music folder that I use with Plex Media Server. Hundreds of folders were ghosted or greyed out an inaccessible.

    I was able to access the files through the Synology Disk Station web interface, not via Mac Finder and Plex could not access the files.

    Solution

    All the inaccessible files had a “creation date” of 1984. Multiple websites explain that updating the creation date to something current would fix the problem.

    The quickest way to do this that work for me was using Skytag’s FileBuddy.

    As an aside I attempted a command-line string “touch -t 201911240000 /Volumes/MUSIC/*” but it didn’t work for me. I was able to change the date modified, but not the date created.

    Once you install File Buddy the process is rather simple.

    1. Select all the folders and drag them to top of the File Buddy program icon on the Dock.
    2. Once File Buddy opens, click OK on the Get Info screen if it appears.
    3. You should get a screen similar to the one above. Simply change the Created Date using the drop-down, I just used Current Date and Time.
    4. Click “Change All”. This may take a few minutes if you have lots of files. Once complete the problem should be fixed.

    I honestly don’t know what caused the problem in the first place, but wanted to pass along what I found to be the quickest solution.

  • Late Night Repair

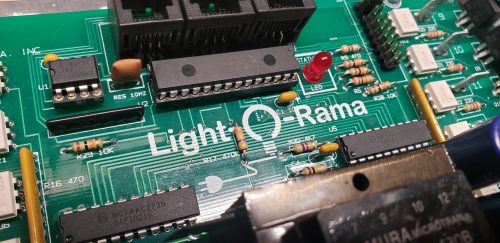
    Light-O-Rama CTB16PC 16 Channel Lighting Controller

    In helping my son prepare and set up his Christmas light show this year we discovered half the channels on this controller stopped working. This is our second Light-O-Rama CTB16PC controller, both were purchased as a kit.

    Just in case another Light-O-Rama ower runs into this page here’s the troubleshooting we performed and the ultimate solution that fixed our issue. (Spoiler: Assembly Mistake!)

    Symptom: Channels 1-8 Not Working. The controller connects to the network fine, 9-16 working 100%.

    Troubleshooting: First thought, blown fuse. We were setting things up in the rain and assumed it was related to a short.

    Fuse tested fine with a multimeter, swapped the two fuses in the unit, again fuses working fine.

    Used the multimeter to confirm 120v making it through fuse hold and tested each “hot” channel output. Things normal, although no voltage on channel 1-8 hots, as expected.

    After reviewing the Light-O-Rama forums I decided to take the controller completely apart and check for any bad solder joints. Of course, I made this decision at 11 PM. I was really trying to avoid this, such a time-consuming process.

    Success! After a few minutes of careful inspection, I found two pins on an IC that I plain missed completely during assembly, no solder! I carefully applied solder, checked a few other spots and reassembled.

    BINGO! Problem solved.

    U4 IC 20 PIN (74ACT273)

  • Backing Up Large Video File Collections to AWS Glacier Deep Archive

    Part 1 – Why AWS Glacier Deep Archive?

    Backing up large collections of raw video footage and edit masters remains a real challenge for anyone working in the video production world. As the Executive Director of a local community media station, I’m responsible for maintaining a Synology NAS which currently holds 55TB of final edit master videos. The idea of incorporating “Cloud Storage” into our backup procedures has always interested me, but the expense has held me back.

    Until recently, our backup was rudimentary. We utilized Archive.org, which is a wonderful organization operating an online digital library of print, audio, and video works. They allow users to upload high-quality MPG2 files to be added to the collection and unlike YouTube, they offer the ability to download your original upload at any time.

    For us, this was a win-win. Archive.org provided a FREE way for us to share our content, preserve it for the future, and have an offsite backup if we ever needed it.

    We love the Archive and will continue to support them. The main goal of keeping our content open and available to the public for decades to come is just amazing.

    That said, the Archive is NOT a backup solution, but given our budget constraints, it was a quasi backup. We frequently said, “If the Synology NAS went up in flames, at least the videos would not be lost forever”…but the recovery process might take that long.

    When I learned about Amazon’s Glacier Deep Archive service earlier this year I was instantly intrigued and thought this might finally be a perfect solution for our needs. At “$1 per TERABYTE per month” they certainly had my attention.

    Glacier Deep Archive is a new product offering by Amazon Web Services (AWS) that falls under their S3 Storage product line. Deep Archive is the lowest cost storage class. When Amazon released the new storage class on March 27, 2019 their press release highlighted several use cases including media and entertainment companies:

    “there are organizations, such as media and entertainment companies, that want to keep a backup copy of core intellectual property. These datasets are often very large, consisting of multiple petabytes, and yet typically only a small percentage of this data is ever accessed—once or twice a year at most. To retain data long-term, many organizations turn to on-premises magnetic tape libraries or offsite tape archival services. However, maintaining this tape infrastructure is difficult and time-consuming; tapes degrade if not properly stored and require multiple copies, frequent validation, and periodic refreshes to maintain data durability.”

    Amazon Web Services Press Release, March 2019

    There is some “fine print” to be aware of, although none of it’s a real concern for me. There are additional charges for recovering your data and the data is not instantly available, retrieval time is up to 12hrs, but that’s the trade-off for the low cost. Again, not a big deal for my use case. You can check out the Amazon S3 Website for more specifics. The whole idea of Glacier Deep Archive is LONG TERM storage, files that you need to keep and don’t want to lose but may never actually need to access if your local files remain intact.

    For media professionals, I see Glacier Deep Archive as a great tool for:

    • Wedding and Event Videographers who want to backup raw footage, master files, and other assets.
    • Community Media Stations (PEG Access) looking to backup programs and raw footage.
    • Local Production Companies, again for all the same reasons.

    Before I share my workflow and experiences with AWS Glacier Deep Archive let’s jump back for a second and talk about backup best practices for just a minute.

    3-2-1 Backup

    Peter Krogh’s 3-2-1 Backup Strategy is a well-known best practice adopted by IT professionals and the government. The 3-2-1 concept is rather simple:

    3. Keep at least three copies of your data
    The original copy and two backups.

    2. Keep the backed-up data on two different storage types
    Multiple copies prevent you from losing the only copy of your data. Multiple locations ensure that there is no single point of failure and your data is safe from disasters such as fires and floods.

    1. Keep at least one copy of the data offsite
    Even if you have two copies on two separate storage types but both are stored onsite, a local disaster could wipe out both of them. Keep a third copy in an offsite location, like the cloud.

    With the 3-2-1 Backup goals in mind, I’d like to share my experiences with AWS Deep Archive in Part 2 of this blog post. I’ll share the workflow I’ve established after running into some issues initially.

    Keep in mind, I’m new to the AWS platform and I’m a media professional, not an IT genius. I am a tech geek and enjoy the challenge of learning new things. If you have any feedback, tips, or suggestions please feel free to post in the comments.

    Part 2 – Backup to AWS Glacier Deep Archive using CLI
    Coming Soon

  • Upgrade MediaWiki, 5 Easy Steps Using FTP and Web Browser

    MediaWiki Easy UpgradeI run a relatively small wiki using MediaWiki hosted on a Dreamhost server. Generally, I like to stay on top of upgrades for the security patches, new features, and bug fixes but the manual upgrade process makes me nervous.

    I’ve been burned from nightmare Drupal CMS upgrades in the past. Losing hours of my life to troubleshooting and rebuilding is not something I ever want to repeat.

    Anyway, I’ve procrastinated for a while now on this MediaWiki upgrade. I finally decided to jump in this week and get it done. I thought I would share the process I used, which is not exactly the recommended process on the MediaWiki website, but I found it easy and straight forward.  I successfully avoided the command line, which makes me somewhat nervous and certainly not in my comfort zone.

    (more…)