Category: Tips

  • Trim video without re-encoding using ffmpeg

    I’ve been taking the time to learn ffmpeg and some of the really useful stuff you can do with this command line tool (CLI).

    Here’s one example of a situation I find myself in frequently and have not had a great solution until now.

    The ability to trim a video file without re-encoding!

    “Re-encoding” means loss of video quality in my mind. Not quite as bad as copying a VHS tape, known in the analog world as a “generation loss” Having the ability to trim a video file WITHOUT suffering any quality loss, that was a WOW ffmpeg moment for me.

    This is an issue that comes up frequently in community media and I’m sure all video professionals have delt with this issue.

    You have some raw footage you wan to keep for the future, but the camera operator forgot to stop recording and the file has a bunch of “junk” at the end.

    Or you digitized some analog tapes and during the process you walk away only to come back to “snow” or “junk” at the end of the tape that you have now just captured.

    Or you have a video file with the standard leader of color bars and countdown at the beginning. You want to trim the footage, but don’t want to lose video quality in the process…

    So you either keep all the extra “junk” taking up space on your drive or you open up your editing software and edit out the junk and take the hit and re-encode.

    Right now, I’m cleaning up a 70TB Synology NAS that is nearly full. I found several large files that fit the above examples.

    Using ffmpeg and a rather simple command line, I was able to clean up some of these files and free up some space.

    Here’s an example of the command line I used:

    ffmpeg -i BestVideoEver.mov -ss 00:37 -t 51:14 -c:a copy -c:v copy BestVideoEver-trimmed.mov

    To break this string down just a bit, here’s what’s happening

    -i = Input Video
    -ss 00:00 = In-Point (everything before will be removed)
    -t 00:00 = Out-Point (everything after will be removed)
    -c:a copy = Copy Audio (Copy NOT re-encode)
    -c:v copy = Copy Video (Copy NOT re-encode)

    Finally “BestVideoEver-trimmed.mov” is the ffmpeg output file, which you can set to a specific destination if you want, for example:

    ffmpeg -i BestVideoEver.mov -ss 00:37 -t 51:14 -c:a copy -c:v copy /users/michaelwebber/Desktop/BestVideoEver-trimmed.mov

    Anyway, that’s it! Something I learned how to do recently and wanted to share just in case others find it useful.

    If you want to learn MUCH more about ffmpeg I recommend reading this blog post. Covers a whole bunch of topics including how to install ffmpeg and many of the cool features. Never knew you could edit video and even add text graphics with ffmpeg. I really recommend this blog post at img.ly, an in-depth, well-organized post.

  • Zoom TV Interviews

    Feeding our Blackmagic ATEM Switcher with Zoom Participants

    Four computers running Zoom feeding Blackmagic ATEM

    A few weeks ago I had a blog post on my Zoom and Stream Deck configuration to support TV interviews. The setup continues to evolve and I wanted to take a moment to share an update.

    The biggest problem we have with Zoom is the Audio-Follow-Video auto-switching within Zoom. We prefer to see people full screen and don’t want to depend on the gallery view, in fact I try to avoid it.

    Using the spotlight or pin tools in Zoom just doesn’t work fast enough for our purposes. We want to cut between participants just like we would in a traditional in-studio interview show. This includes reaction shots and cutaways.

    Multiple Zoom Calls Into Switcher

    The new setup we’re experimenting with uses multiple PCs, all with separate Zoom connections, each set to full screen with a single participant “pinned”. The output of each PC feeds the Blackmagic ATEM via HDMI as a source.

    I was a little concerned about lip-sync or slight delays between PC connections to Zoom. Thankfully that’s been a non-issue, everything syncs!

    Primary Audio

    To be clear, we’re only pulling audio from ONE of the PCs (input #1) with the gallery view display. All other switcher inputs are video only.

    Once setup and configures, which does take a few minutes to establish all the Zoom calls, it works great! We can now switch between headshots, in the same way we would if guests were in-studio. I can bring in lower third graphics without fear the Zoom auto-switching and don’t need to chase pinning and spotlighting people.

    The only downside is the number of PCs needed… To have a true single shot of everyone you need one more PC than you have participants. (one is always dedicated to the gallery or multiview.)

    So in this case I have FOUR workstations running Zoom for a three-person show.

    Couple of Notes & Tips

    • “Hide self-view” on the PC displaying the gallery view.
    • All other Zoom workstations should have their mic and cameras OFF as they are for view only purposes of feeding the switcher.
    • All Zoom workstations must be set up in a dual-monitor setup, with the pinned zoom person on the second monitor. Then you want to open up the chatbox and place it on the first (primary monitor) THIS IS CRITICAL! Placing the chat box open on the primary monitor avoids pop-up alerts on your full screen pinned video. (Hopefully, that makes sense)
    • You also want to “Hide all non-video participants” on the main gallery view feed so you don’t see all the extra zoom caller PCs feeding the switcher.

    Happy to answer any questions and would love to hear anyone with suggestions on how I might improve things.

    What a mess! Our experimental COVID-19 rig is constantly changing. The lessons learned from this will no doubt alter our planned studio and control room upgrades scheduled for this year.
  • Stream Deck for Zoom Meetings

    Stream Deck for Zoom Meetings

    UPDATE: My setup for Zoom has evolved and somewhat less dependent on StreamDeck now. You may want to check out my new Blog Post with our updated Zoom setup for TV interviews.

    This week I purchased a Stream Deck XL ($235) to help streamline our video productions with Zoom remote guests.

    Since the COVID-19 crisis hit mid-March our community television station scrambled to adapt and help disseminate important information. Zoom quickly became the go-to platform for setting up meetings and remote show guests.

    In the past few weeks, we’ve produced more than a dozen programs using Zoom. Initially, we had an in-studio host and multiple remote guests displayed on an in-studio monitor. Now, most of our interview shows a produced entirely on Zoom.

    Despite the limitations, we are making every effort to maintain high production values, focusing on:

    • Good Clean Audio
    • Well Composed Shots (eyes on the upper third!)
    • Shot sequencing, Close Ups / Multi-Box Switching
    • Graphics, Lower Thirds, Etc.
    • Open/Close Music
    • Still Store for Inserts

    Our existing television studio was not set up well for the shift in production style. This prompted us to build a temporary video production console on several folding tables right inside our studio.

    Adding Steam Deck XL into the Workflow

    Using the Zoom keyboard shortcuts certainly helps the production value. I find myself using Shift-Command-W (Mac) constantly to switch between Speaker view and Gallery View in Zoom. To me that’s the key to using zoom for video production. You can force a better cadence of switching that matches the conversation.

    I do wish there was a way within Zoom that I could force a certain camera view to appear full screen, similar to the normal workflow of a video production switcher. Zoom does offer a “spotlight video” option which does this, but it’s not mapped to a keyboard shortcut and requires too many mouse clicks to make it useful.

    Another shortcut I use often hides the control panel buttons on the lower part of the screen.

    The Stream Deck XL simply automates the keyboard shortcut process and reduces keystrokes to a single button. Allowing new users in the video production environment to get up to speed faster and with better results.

    TIP – ENABLE GLOBAL SHORTCUT

    Enabling global shortcuts really helps the Stream Deck configuration. This setting allows the shortcuts to work even when Zoom is not in focus.

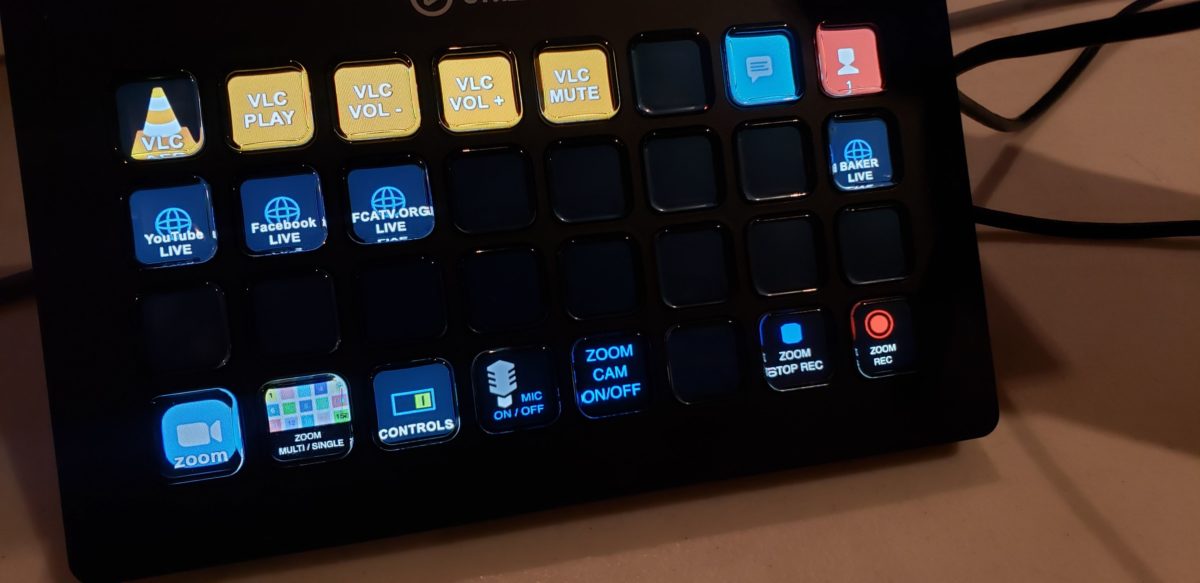
    We’re also using VLC shortcuts to play intro/outro music.

    Bottom row of buttons on our Stream Deck are all shortcuts for Zoom.

    Then I added several shortcuts to websites we use for our live broadcasts.

    A work in progress, but thought I’d share what we have setup so far. If you’re using Stream Deck for video production I’d be curious to hear your use case.

  • FIX: Greyed Out Folders on Mac OS

    Recently I had an issue with my Synology NAS Music folder that I use with Plex Media Server. Hundreds of folders were ghosted or greyed out an inaccessible.

    I was able to access the files through the Synology Disk Station web interface, not via Mac Finder and Plex could not access the files.

    Solution

    All the inaccessible files had a “creation date” of 1984. Multiple websites explain that updating the creation date to something current would fix the problem.

    The quickest way to do this that work for me was using Skytag’s FileBuddy.

    As an aside I attempted a command-line string “touch -t 201911240000 /Volumes/MUSIC/*” but it didn’t work for me. I was able to change the date modified, but not the date created.

    Once you install File Buddy the process is rather simple.

    1. Select all the folders and drag them to top of the File Buddy program icon on the Dock.
    2. Once File Buddy opens, click OK on the Get Info screen if it appears.
    3. You should get a screen similar to the one above. Simply change the Created Date using the drop-down, I just used Current Date and Time.
    4. Click “Change All”. This may take a few minutes if you have lots of files. Once complete the problem should be fixed.

    I honestly don’t know what caused the problem in the first place, but wanted to pass along what I found to be the quickest solution.

  • My Switch from HTPC to Tivo Blot

    I recently purchased a Tivo Bolt to replace my Home Theater PC (HTPC). I currently have the Tivo setup using the antenna (over the air) feature along with the Amazon Prime, which is an app built into the box. We currently do not have a cable subscription.

    It just works! While I enjoyed configuring my own HTPC, running open source software and “getting under the hood” it was becoming a time suck. Don’t get me wrong, in the beginning I used Windows Media Center, which was great software, but once Microsoft discontinued updates in 2009 I began experimenting with various open source options: XBMC, Kodi, mythTV DVR…the list goes on.

    Time to Move On…

    In late 2015 I finally decided it was time to move on from the home-brew setup. I had my spent enough time tweaking and playing around with all the neat software options. The reality was, it was consuming too much time and my pursuit to find just the right solution was coming up short.

    In Comes Tivo Bolt

    When I realized Tivo had a product that would take in OTA signal, provide an electronic program guide, and DVR I purchased immediately. The program guide and DVR were both a struggle to keep working on the HTPC, the Tivo just worked.

    I had looked around several times for a device like this before, but could never find ALL the features I was looking for:

    • Antenna Tuner for Over the Air TV Reception
    • Reliable DVR
    • Electronic Program Guide
    • Ability to Access and Play Personal Video Library (Home Movies and Digitized DVD Collection)

    The Tivo Bolt had it all, the only drawback was the monthly fee. I was trying to avoid an ongoing monthly fee, but ultimately decided the modest fee was well worth the time saved.

    The Tivo Bolt box is much smaller than any HTPC, less wires, and consumes much less power.

    I’ve been using the Bolt for a few months now and just thrilled. The features FAR exceed my expectations, a few that have turned out to extremely useful in our house:

    • Recording FOUR shows at once – you would think with antenna only TV we would never use four tuners, think again!
    • Mobile App – being able to watch DVR recordings on my cell phone or tablet while the kids are using the main TV is a nice bonus. Note, this feature does not work outside the house/remotely. You need to be connected to the same wifi network that Bolt is located.
    • Skip Mode, jumping past an entire commercial break works remarkably well, but not available for all programs.
    • Quick Mode – the feature that allow you to watch 30% faster with pitch perfect audio. A great way to get through news programs and other talk show formats.
    • PLEX App – This is the final piece of the puzzle for me. Tivo Bolt comes with the Plex App installed, allowing the Bolt to connect to a remote Ple Server where I can have all my home movies and digitized DVD library available. This weekend I finally had an opportunity to setup a PLEX server and have it working. So far, so good. I’ve run into a few glitches, mostly minor ones. I hope to write a short blog post about my setup shortly.

    Tivo Bolt is great product for my situation, initially cost is less than a home built HTPC and the monthly fee is reasonable considering the long list of features and reliability. My first experience with Tivo, well done!


  • WordPress – Make Top Level Menus without Creating Placeholder Pages

    Add this little trick to the DUH category, one of those little things I should have looked up years ago. Very often with WordPress sites you want to create a menu bar based on categories, such as the one below.

    Normally to do this you would setup a page or link for each menu item, both top level and sub-menus. But often we don’t want the top level to link anywhere, we simply want it to reveal the sub-menu. A placeholder of sorts.

    Creating top level menus in WordPress that are inactive (not clickable)
    Creating top level menus in WordPress that are inactive (not clickable)

    In the past I did this by creating a blank page in WordPress, adding that page to the menu. The problem with this method is if the visitor clicks on the top level menu the blank page displays, not ideal.

    The work around or trick is to add a “custom link” to the menu instead of a page. Then add a simple # symbol in the link field.

    CustomLinkMenuWordpressThis does create a link, but it goes nowhere and in effect does what we want.

    If for some reason you don’t see “Custom Links” under Appearance>Menus, you may need to click on “Screen Options” (top right) and turn on.

    It’s the little things sometimes…